
視錯覺紋身
Lewisink專注於幾何紋身。他使用模板,使設計完全對稱。內幕團隊認為,生命是一種冒險!訂閱我們的渠道和訪問我們的網站:https://thisisinsider.com內幕在Facebook上:https://www.facebook.com/thisis...

Ocean Blue Jellyfish Earringsゆらゆら 涼しげクラゲピアス What You Need UV LED resin KIYOHARA Resin colorant Blue Green White Hemispherical silicon mold UV light 9w Aurora packing Hand drill Heaton Pierce metal fittings Round can Steps 1 Cut 5 6 aurora packings to about 3cm 2 Put a green colored resin on the aurora packing and cure it for about 10 seconds to make jellyfish legs 3 Pour a white colored resin into the hemispherical mold and draw a pattern 4 Pour green resin from above and cure with UV light for 10 seconds while turning the mold to make a jellyfish umbrella part 5 Once removed add resin from above to shape the jellyfish umbrella 6 Place the resin inside the umbrella and glue the jellyfish feet 7 Make a hole in the head of the umbrella with a hand drill and glue the heaton with a small amount of resin 8 Complete with piercing parts 海の中をゆらゆら漂うクラゲ その神秘的な雰囲気をそのままアクセサリーに 暑 い今の季節にぴったりな涼しげアイテムのご提案です 材料 UV LEDレジン KIYOHARA レジン着色剤 ブルー グリーン ホワイト 半球シリコンモールド UVライト 9w オーロラパッキン ハンドドリル ヒートン ピアス金具 丸カン 作り方 1 オーロラパッキンを5 6本 約3cmにカットする 2 緑に着色したレジンをオーロラパッキンにつけ 約 10 秒硬化させてクラゲの足を作る 3 半球モールドの中に 白色に着色したレジンを流し 模様を描く 4 上から緑のレジンを流し入れ モールドを回しながらUVライトで約 10 秒硬化させ クラゲの傘を作る 5 取り外したら 上からレジンを足してクラゲの傘の形を整える 6 傘の内側にレジンをつけ 足を接着する 7 傘の頭にハンドドリルで穴を開け レジンを少量つけたヒートンを接着する 8 ピアス金具を取り付けて完成 半球モールドから外したレジンのてっぺんに少しレジンを足すと クラゲのカサがよりリアルになります レジンを扱う際は手袋をして直接手に触れないようにし 使用中と使用後は換気を十分に行ってください
Lewisink專注於幾何紋身。他使用模板,使設計完全對稱。內幕團隊認為,生命是一種冒險!訂閱我們的渠道和訪問我們的網站:https://thisisinsider.com內幕在Facebook上:https://www.facebook.com/thisis...
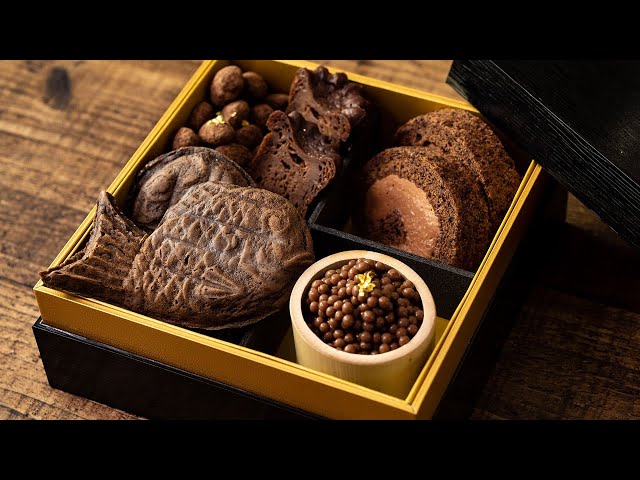
カカオめまして!今年もよろしくお願いします!∴∵ゞ(´ω`*)♪ 今回はカカオ家のおせち料理です。ベーシックなものをお重に並べると意外と絵になりますね。 Translation will be available shortly.
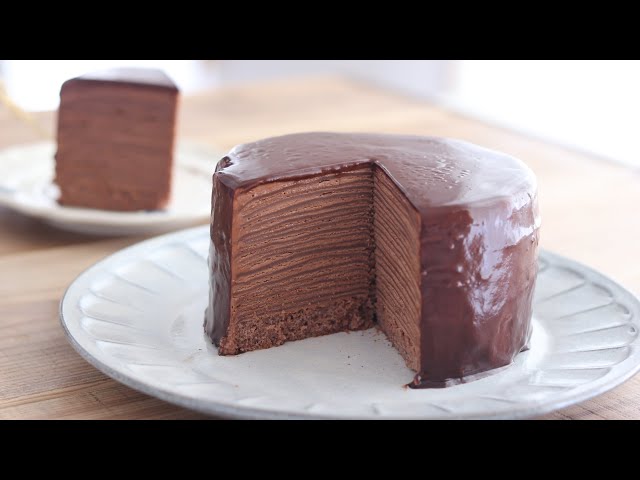
HidaMari Cooking(ひだまりクッキング)へようこそ。 このチャンネルでは、チョコレートや抹茶、季節のフルーツを使ったお菓子のレシピを中心に投稿しています。
Plant Power is a 100% vegan fast food chain based in California. The chain serves everything from buffalo wings to burgers and is ...


【PR Desenio】

Thanks so much for tuning into today’s video - NATASHA DENONA Metropolis Palette - First Impressions. Hope you enjoy! xoxo
안녕하세요~ 오늘도 제 채널에 방문해주셔서 감사드립니다~! 이번 영상에는 초콜릿이 코팅된 마들렌 레시피가 포함되어 있어요~ 과정이 복잡하지 않아서 쉽게 따라 만드실 수 있을거예요:) 그럼 이번 영상도 재밌게 시청해주세요~~💗😘😘


記得訂閱頻道,打開小鈴鐺🔔 https://goo.gl/PFKb3d 每週三、六 21:30分準時發片😎 Email ▸▸▸ courage0024@hotmail.com.tw (For business inquiries) Facebook ▸▸▸...
はなの一才の誕生日を記念して。This is the commemorative video of Hana's 1st birthday.

In this video I have invited a special guest...my stitchy friend Kristie from Crosshatch Quilts is here and we are showi...

How to paint dandelions using starbucks paper cup / Acrylic Painting Techniques - JayLee ❖ Jay Lee is a painting youtube...

こんにちは、こんばんは!樹(いつき)です♪今日の動画の推しポイントは『アルミホイルを踏んだ時のぴーちゃんの足プルプル』です!ぜひ、注目して見てみてください😜🙏

あまり体型について言及することはありませんでしたが、私が激太りしたこと皆様気がついていたと思います。これからは胸を張って今の自分から逃げずに発信したいと思いました。ちょっと怖くて全身を映したりしていなかったのですが、徐々にコーデも紹介したい...
![BJD Levi Ackerman [Attack on Titan] Box Opening / Unboxing](https://i.ytimg.com/vi/fi1ysk_Sdpg/mqdefault.jpg)
I got my hands on a Levi BJD! :) I felt it was the perfect timing since season 4 is the last season! What I really loved...

ケイトから2/1に発売の「ケイト パーツリサイズシャドウ」は新発想のアイシャドウ! 下まぶたに重点をおいたアイシャドウで、ほほの余白が埋まり小顔印象が際立つ顔に仕上がりに👀 でか目と小顔が一気に叶えられる理想的なアイシャドウなんです💡 カラ...

たっくさんリクエスト頂いているので、金曜日にアップしようと思っていた #スック の新作アイシャドウ #シグニチャカラーアイズ のレビューを本日アップしますー♪ てへ♡とりあえず月曜日、頑張ったぜ今日も俺たち、、、なっ!ってテンションで ご覧...

안녕하세요. 조꽁드입니다. 이 영상을 시작으로 4편의 크림치즈 디저트 레시피를 올릴 예정입니다. 주식회사 동서가 새로이 선보이는 독일산 필라델피아 크림치즈 제품을 제공받아 레시피 영상을 제작 하게 되었습니다. (유...
Copyright © 2017 - All Rights Reserved - www.ichaowu.com

